|
Our work area was in a room at the school, with tile floors that we had to protect, and that got a lot of use for other things.
It's definitely an advantage to use an area where you can just leave everything set up. We would start each building session, whether one day or a multiple day sleepover, with setting up the area, and end it with tearing down and sweeping up. Sweeping up every day is a great idea, but taking things down all the time is inconvenient. We got to be pretty good at set-up and tear-down!
There were also advantages to the room we had to work in. One was that it was extremely well lit. There were ample flourescents and light colored walls, plus a door and window at one end. Even still, we sometimes used clamp on floodlamps and other worklights, especially when we were finishing. The area was also large and well ventilated by the school's regular HVAV system, which we sometimes augmented by propping open a couple of outside doors and pulling air through with fans.
Here's a picture of the work area layout that we used for most of the project:
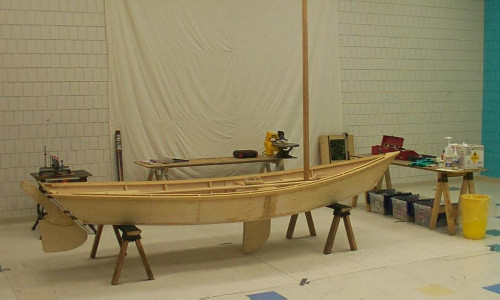
We used a couple of 10' square canvas painters' tarps, held down with duct tape to prevent us constantly tripping. They are a bit more expensive than plastic dropcloths or tarps, but extremely durable, convenient, and less likely to cause a slip and fall accident. They were worth paying more for. Beware that duct tape adheisive will leave residue if you leave it down more than a couple of days. We tried never to let it stay down that long.
The two main worktables were 2 foot by 8 foot 1/2" chip-board, reinforced on the underside with 2x2's and held up by sawhorses. The sawhorses use standard cheap stamped metal brackets, but were also held together with screws, and had braces attached between each pair of legs to stop them from wobbling.
The table toward the right held our gluing area and most of the tools:
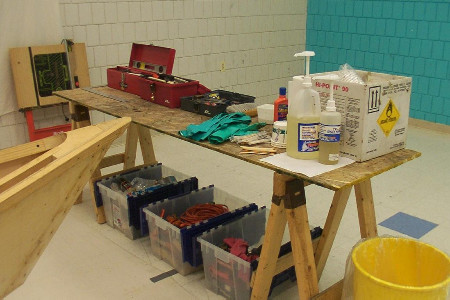
From right to left on the table above, epoxy and supplies, including gloves, hand cleaner, stirrers, additives; a toolbox with measuring tools; two toolboxes with various hand tools. Beneath the table are 3 of the 4 tubs we stored most of our tools and supplies in between building sessions. Note also the cross-braces on the legs of the sawhorses, that I mentioned above.
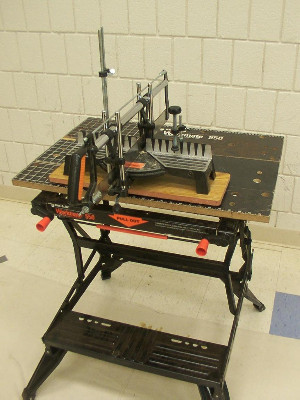
Another couple of items I bought at the beginning of this project that were exceptionally useful, were a Workmate and a decent quality miter box, as seen in the next picture:
Laid out on the table, below, are the hand and power tools we probably used the most:
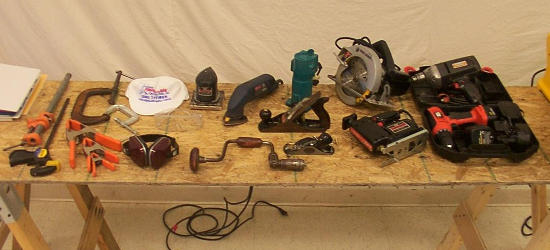
Starting from left:
- You can never have enough clamps! We used all kinds -- bar clamps, QuikClamps, C-clamps, and dozens of spring clamps in various sizes.
- Hearing and eye protection, plus hats to keep girls' hair out of the project and various kinds of goop out of the girls' hair. Don't forget gloves, too.
- The brace is a family heirloom. I found it a powerful yet easily controlled way to drive screws.
- The bench plane and low angle block plane are good for quick and precise removal of stock. Buy quality: Stanley is okay, but be sure to look for their better grade models. Their bottom of the line block plane is, to be kind, junk.
- Detail sander and palm sander supplement hand sanding and sanding blocks. Plan on using a lot of sandpaper!
- The laminate trimmer makes for a handy sized router for rounding over edges and other light trimming operations.
- Circular and saber saws. I didn't let the kids use the circular saw, for the most part. Too dangerous. But they used the scroll saw a lot from almost the first day.
- A variable speed battery powered drill driver is less likely to strip screws or otherwise get out of hand, while the AC powered variable speed drill is good when you need a lot of torque or have a lot of holes or a very large or deep hole to drill.

At left above is my 20" variable speed scroll saw. It was a factory reconditioned unit bought through Harbor Freight at a goodly discount. The only fault we ever noticed was a small cosmetic blemish on one of the DeWalt nameplates! An excellent tool that we used a lot.
To the right, folded and leaning against the wall, is a portable stand you can mount your circular saw in and use as a light weight table saw. Before this project I'd not used this gizmo very often, but now I found that it to be very useful.
You'll find many more tools and tricks that will become part of your boatbuilding repetoir. This is just to give you an idea of some things you might like to put on your birthday or Christmas lists!
Continue with Hull Sides